How to Put Border Around Drawing in Clip Studio Paint
Editing your text in Clip Studio Paint is fairly different than other software. When I start started to use Clip Studio this was ane of the first things I noticed.
Some things are pretty straightforward and others required a bit more than work.
The reason for these might be because Clip Studio is made more for illustration than text. Fifty-fifty though yous can make comics and manga, the text is supposed to exist quite simple, and then you lot shouldn't need a lot of editing tools for information technology.
How can you edit your text in Clip Studio Paint? For very elementary editing like changing fonts, it's size, orientation and even style you tin can simply press the "T" button on your keyboard or go to the toolbar and select the tool that shows an capital letter "A". This will open up the text window and volition let y'all create text layers and edit them.
But at that place'south and so much more to editing text than what shows! Changing colors, rotating and even angle text is something yous can do in Prune Studio and yous need a few more steps.
For that reason, I wrote this guide to help you out: from simple editing of text to more complex transformations y'all tin can do to it.
Editing Text In Clip Studio Pigment
Clip Studio Paint has very basic text editing. On the positive side, it is very simple to use. On the other hand, it doesn't have a lot of editing options. From a quick glance, it has very simple and bones options like irresolute colors, sizes of font and of grade, fonts.
It is worth to mention that Clip Studio is mostly for illustration or to create your own comics/manga. For this reason, text options will announced very different than they do in other software.
Y'all can still do a lot of creative things with your text though! Only need to roam a bit deeper into the tools and options.
Showtime things offset: Simple editing of your text! When y'all pick the text tool, by pushing the "T" button on your keyboard or clicking the push with an "A" on the toolbar on the left, some options will appear correct away.
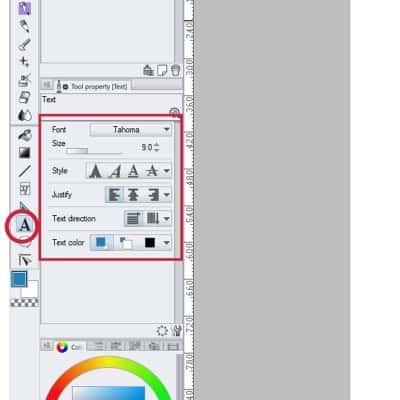
Yous tin choose the font of your option, change the font size and others. If you demand to modify a bit of text in your textbox, it's very simple. Similar in whatsoever other software, simply hover the mouse on the letter yous want to change and click on information technology.
Now you just need to re-input the text as you desire.
You can also select specific parts of the text by belongings the left button of the mouse and moving information technology until the text y'all want to change is selected.
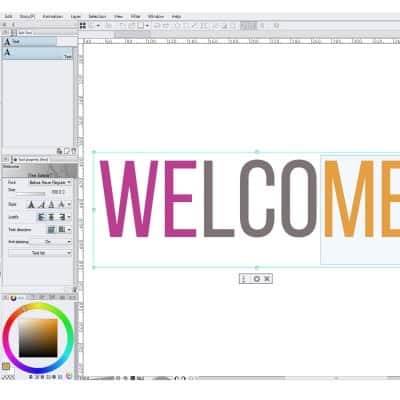
This is very simple editing. You can select different parts of your text and give it different sizes. One box of text can have words with different fonts, sizes, styles, and fifty-fifty colors. It can be very useful to use when you lot want to pull more attention to certain words.
This way, you too won't need to make several boxes of text for each word.
Amidst other options, you can also choose the mode for your text. Allow'south say your fonts don't have bolded or italic options. Well, Clip Studio tin can simulate these styles for yous! Right below the font size you lot accept different fashion options similar Assuming, Italic, Underline and Strike Out.
Over again, you tin can choose to apply these styles to but one word on your text box, or a specific letter. Simple select the bits yous want to apply the style to and click on the option you desire!
How To Move Text In Clip Studio Paint
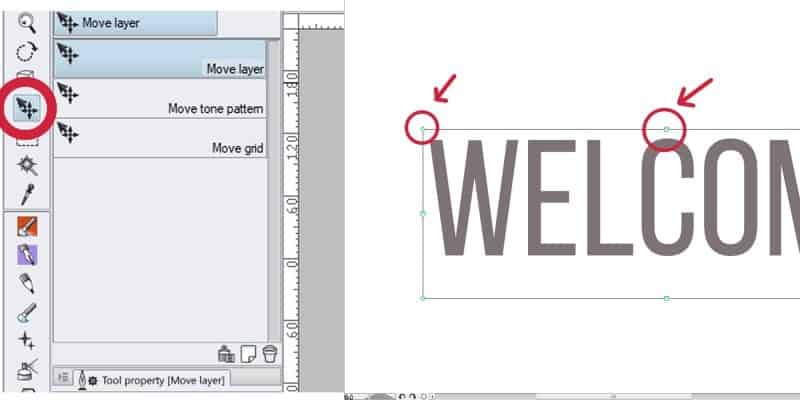
Moving your text in Clip Studio Paint is fairly simple as well. Select the layer of text you desire to move. At present press the "K" button or click the button with a blackness pointer on the height of your toolbar. This is the tool you desire to take active when moving annihilation on your opened file.
At present you can motion your text to wherever you desire. This is not the just mode to move your text though! While having the text tool agile you can as well movement your text around while yous edit it.
If you hover your mouse over the text box, you'll notice a pocket-size black arrow actualization. Only press the left push of your mouse when this symbol appears and you tin can motility the textbox around!
Some other thing I want to mention here, very chop-chop is that you can likewise change the size of your text through the text box. Notice the small blue squares and circles around the box? You can use those to scale up or downwards your text.
This is some other way of resizing your text. Personally, I prefer to but change the font size on the editing toolbar. But both ways piece of work and you tin can simply do what feels better for you!
Back to the issue at hand, it's worth to mention that you tin also justify the text on different sizes and even in which management your text is. Just like in any other software, you can align your text to the left, center or right.
Below the justify buttons you can also choose if you desire your text to appear horizontally or vertically.
These options are pretty straightforward and there'southward not much you tin exercise with them. They're yet very useful when moving and presenting your text in the almost pleasing and organized way for your work!
How To Rotate Text In Clip Studio Pigment
Unlike other software, you can't rotate a text layer in Clip Studio. This is rather unfortunate since rotating text is something we end upwardly doing quite often. I do at least and I don't work a lot with text.
Nearly of the times I work with text is when doing cards or adding a link to my illustrations. Sometimes I like to rotate those bits of text to frame information technology better with the drawings I have.
With that said, don't feel defeated though! There are withal means to rotate your text! Actually, there are 3 means to become about information technology.
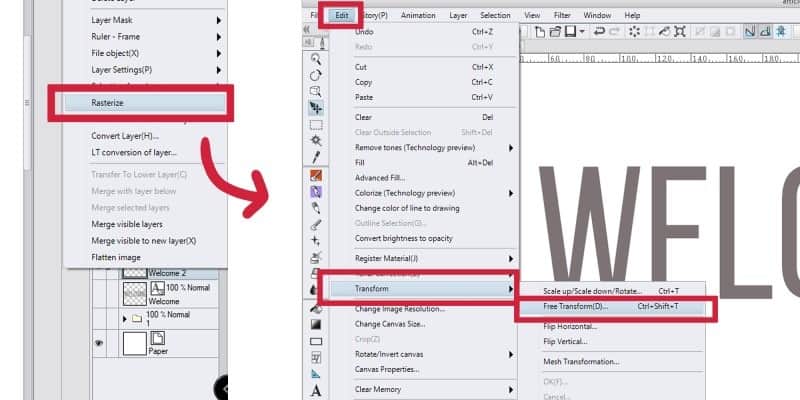
The first i is very simple: Select the text layer, right click on it and pick the "Rasterize" option. Now you lot tin just press Ctrl+T or go to Edit -> Transform -> Free Transform and you are free to rotate your text at will.
Another mode to exercise it is to catechumen your layer. This 2nd pick is fairly like to the later. Again, select the text layer you lot desire to rotate, right click on it and choose the "Catechumen Layer" option. This will open a small window. Change the type to "prototype material layer". At present cull the object tool and y'all tin rotate your text.
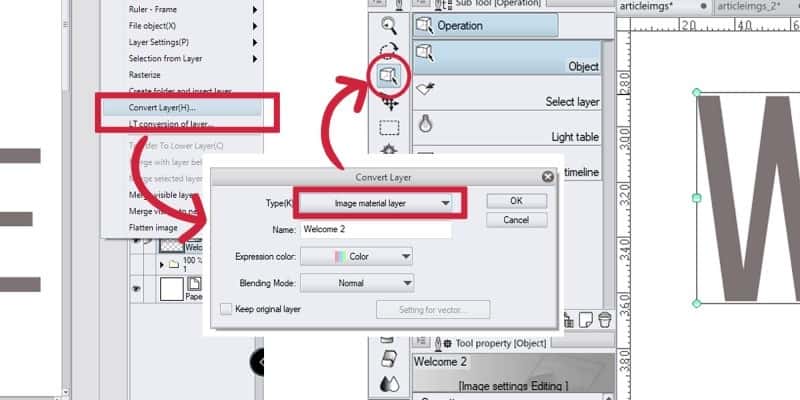
The but divergence between the first option and the 2nd is that you don't demand to Gratuitous transform it every time yous desire to rotate your text differently.
You tin merely pick the object tool and rotate it. Both work and it'due south upward to which do you adopt. In a way, the 2d choice is a chip less consuming if you're going to be rotating your text many times.
There is a problem with using both these methods: you tin't edit your text layer anymore. That layer is gone. Your text is now an image and yous can't modify it'southward font anymore nor resize it. By resizing this paradigm, you'll showtime losing its quality.
In short, these are options you take if you're 100% sure your text is looking as you lot want and you won't change it anymore.
Fret not though. For there is a tertiary option that will let it to edit your text. Again, right-click the layer text. Become to File Object and then click convert layer to file object. Salve it with a name and in a identify where it's like shooting fish in a barrel to detect.
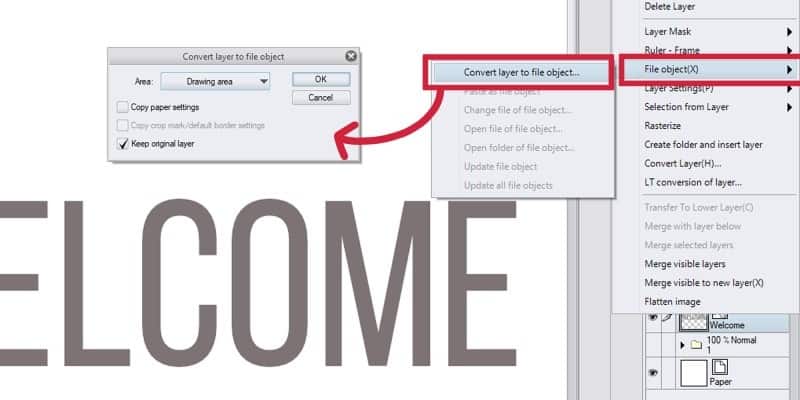
Now you tin can use your object tool and rotate your text freely. If you do demand to edit your text, open the file you just saved, change what needs to be changed and salvage information technology. When you get dorsum to your principal file, you'll notice the text changed accordingly!
Clip Studio has weird ways to work with text, but in one case you know its ways, it gets very uncomplicated and automated to you.
How To Curve And Curve Text In Clip Studio Pigment
Again, sadly this is something y'all can't do in Clip Studio Paint. With rotating, yous can still go your manner around it and do information technology hands. With curving and bending, non and then much.
At that place is still a way to go about it though. It'southward non the most optimized way to bend text, but with some time and patience, y'all tin can add a nice bending effect with your text. For that, you need to rasterize your layer.
As we've seen before, you just demand to correct click the text layer and select Rasterize. Now go to Edit -> Transform -> Mesh Transformation. A box with several points will announced effectually your image.
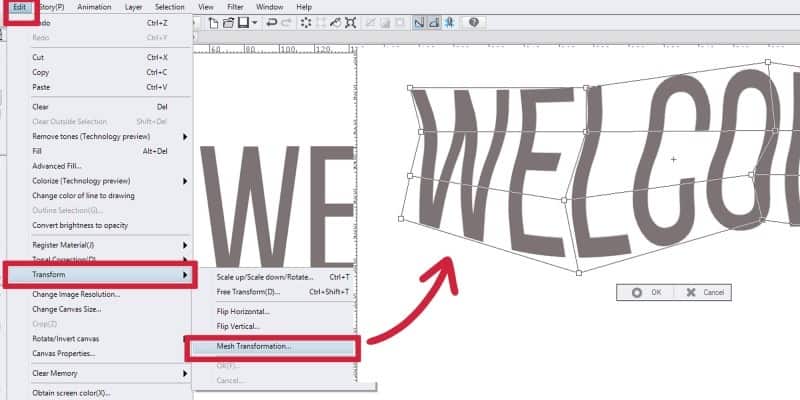
You can edit each of these points as y'all wish. It is not the easiest style to practice it, just y'all'll be able to manage some bend and angle on your text!
How To Outline Text In Clip Studio Paint
Ok, so recollect when I said that Clip Studio has very weird ways to deal with text? This is another example. If you used other software that has detailed text editing, you know how intuitive it tin be.
Again, Prune Studio isn't made to work extensively with text.
So it's normal that we run into the text being treated like it's an image. With that said, it is possible to add an outline or edge to your text in Clip Studio Paint and here's how.
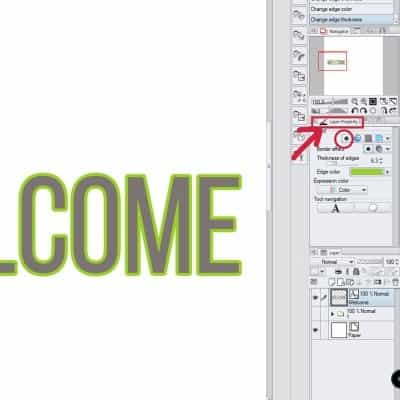
On the left, to a higher place your layer window, you'll probably see another window called "Layer Holding". If it isn't showing, only get to Window ->Layer Property.
On this small window, yous have several visual options that you can choose from. With your text layer select, click on the kickoff icon, the one with a circumvolve and a white outline around it.
Some options for your outline will appear, including how thick you want the outline to be and the color.
Play out with the thickness and pick different colors until you're satisfied with the outline. As you edit information technology, the changes will appear right away on your certificate.
Creating an outline to your drawings or text is fairly easy on Clip Studio and even fun. Information technology'southward just a thing of finding these tools since they're not as explicit right away!
How To Alter Text Color In Prune Studio Paint
Changing Color in Prune Studio Paint is fairly like shooting fish in a barrel and don't worry, there's no demand to rasterize layers and go through a lot of steps for it!
With the text tool selected, you can select the whole text or even segments of it and change it to any colour you want using the color wheel or bar beneath it. I mainly use the color wheel, but you can use and meet the colors however you lot prefer. Clip Studio has different ways to show and pick colors and it all comes downward to preference.
This is one manner to modify text color and the i you take the most control over since yous can cull to add different colors to different messages or words in one textbox.
Another way to change color is past going to Layer Property, select the concluding choice, the icon with a bluish square on top of a white foursquare. At present you can pick whatsoever color you desire. The disadvantage of this method is that you'll modify the color of the whole layer.
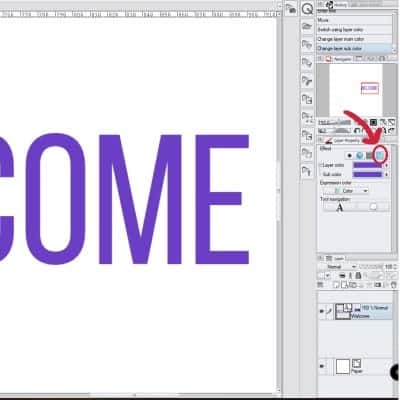
If you want to change the colour of the whole layer and accept the whole text with the same color, the second method is faster. However if y'all wish to have more than control and desire to have your text in different colors, the first method is preferable!
Back to the Blog
Source: https://doncorgi.com/blog/edit-your-text-in-clip-studio-paint/
Posting Komentar untuk "How to Put Border Around Drawing in Clip Studio Paint"